
Employee Details & Joiners And Leavers
Administrators can access the Employee Details page for any user, which allows them to manage key details about that user. The easiest way to access the Employee Details page is from the Dashboard by entering their name in the ‘Search employee’ box. Also, clicking their user name when displayed as a link on various pages of LeaveWizard will also take you to their Employee Details page.
If you want to manage users and select them from a list, then you can do that on the Organisation and Employees page or by clicking the All Employees link in the Company lists section of the Company Settings page.
Please note that if your company has SCIM enabled, the system may disable many of the fields and functions described below.
Joiners
When a new user joins your company, after adding them on the Add Employee page, you can include additional details or edit the information on the ‘Employee Details’ page.
Leavers
When a user leaves your company you should set their ‘Employment End Date’ in the ‘Allowances’ section of the ‘Allowances & Work Pattern’ tab and un-tick ‘Active?’ in the ‘Personal Details’ section of the ‘General’ tab.
Employee Details
The Employee Details sub menu displays the user’s name on the left-hand side and has a ‘View Leave Taken’ button on the right-hand side which will take you to the ‘Leave Requests’ page.

The Employee details page has six tabs, separating specific types of information about a user.
General
Allowances & Work Pattern
Approvers
Employment Information
Additional Details
Family & Emergency Contact
If you edit any section on a tab, you will get the ‘Cancel’ and ‘Submit’ buttons to show that you have made changes. Clicking ‘Cancel’ will remove all the changes and return the information to its previous state. Clicking ‘Submit’ will commit all the changes. If you try to navigate away from a tab without submitting the changes first, it will display a warning message you will lose your changes if you continue.
General Tab
The general tab has three sections: Personal Details, Access Control and Actions.

Personal Details
The Personal Details section has seven fields, of which four are mandatory, and holds the essential basic user information.
First Name
This field allows you to enter the user’s first name. Use of proper case usually looks best, i.e. Janet (Mandatory field).
Last Name
This field allows you to enter the user’s last name. Use of proper case usually looks best, i.e. Ayres (Mandatory field).
User Name
This field allows you to enter a username which should be as a valid email address, i.e. [email protected]. This identifies the user and must be unique in our system (Mandatory field).
This field allows you to enter an email address for this user, i.e. [email protected]. This does not need to be unique. You can use the same email address for multiple users and system generated emails will go to that address (Mandatory field).
Role
This setting allows you to select which role this user has on LeaveWizard. The drop-down box allows selection of ‘Employee’, ‘Line Manager’ or ‘Administrator’. This setting controls what functions are available to the user.
Workgroup
This setting allows you to select an existing company ‘Work group’ from the drop-down box that this user will be a member of.
Active?
This setting allows you to toggle the status of the user between ‘Active’, coloured green and ‘Inactive’ coloured red. LeaveWizard subscriptions costs are based on the number of active users. So, it is important to deactivate users that are no longer with the company so they don’t count against your maximum user limit. Also, the system will continue to send emails to active users. The user data will remain on our system for 180 days, during which you can reactivate them. The system will then delete or anonymise their data in compliance with our privacy policy and GDPR guidelines.
Access Control
The Access Control section allows you to hide a user and control if they can log in.
This Account Is Unable To Log In
This tick box allows you to prohibit a user from logging in. The system will set it automatically when you deactivate a user. It will also temporarily set it after five incorrect password attempts. The user account will then be ‘locked out’ for five minutes.
This Employee Is Hidden From Leave Charts And Lists
This tick box allows for a user to be active on the system but their details to be hidden by ticking the box. This is useful when you wish to hide senior staff information from other users.
Actions
The Actions section allows a welcome email to be sent to the user.
Send Welcome Email
Clicking the ‘Send welcome email’ button will email the user with information about how to set up a password for their user account.
Allowances & Work Pattern tab
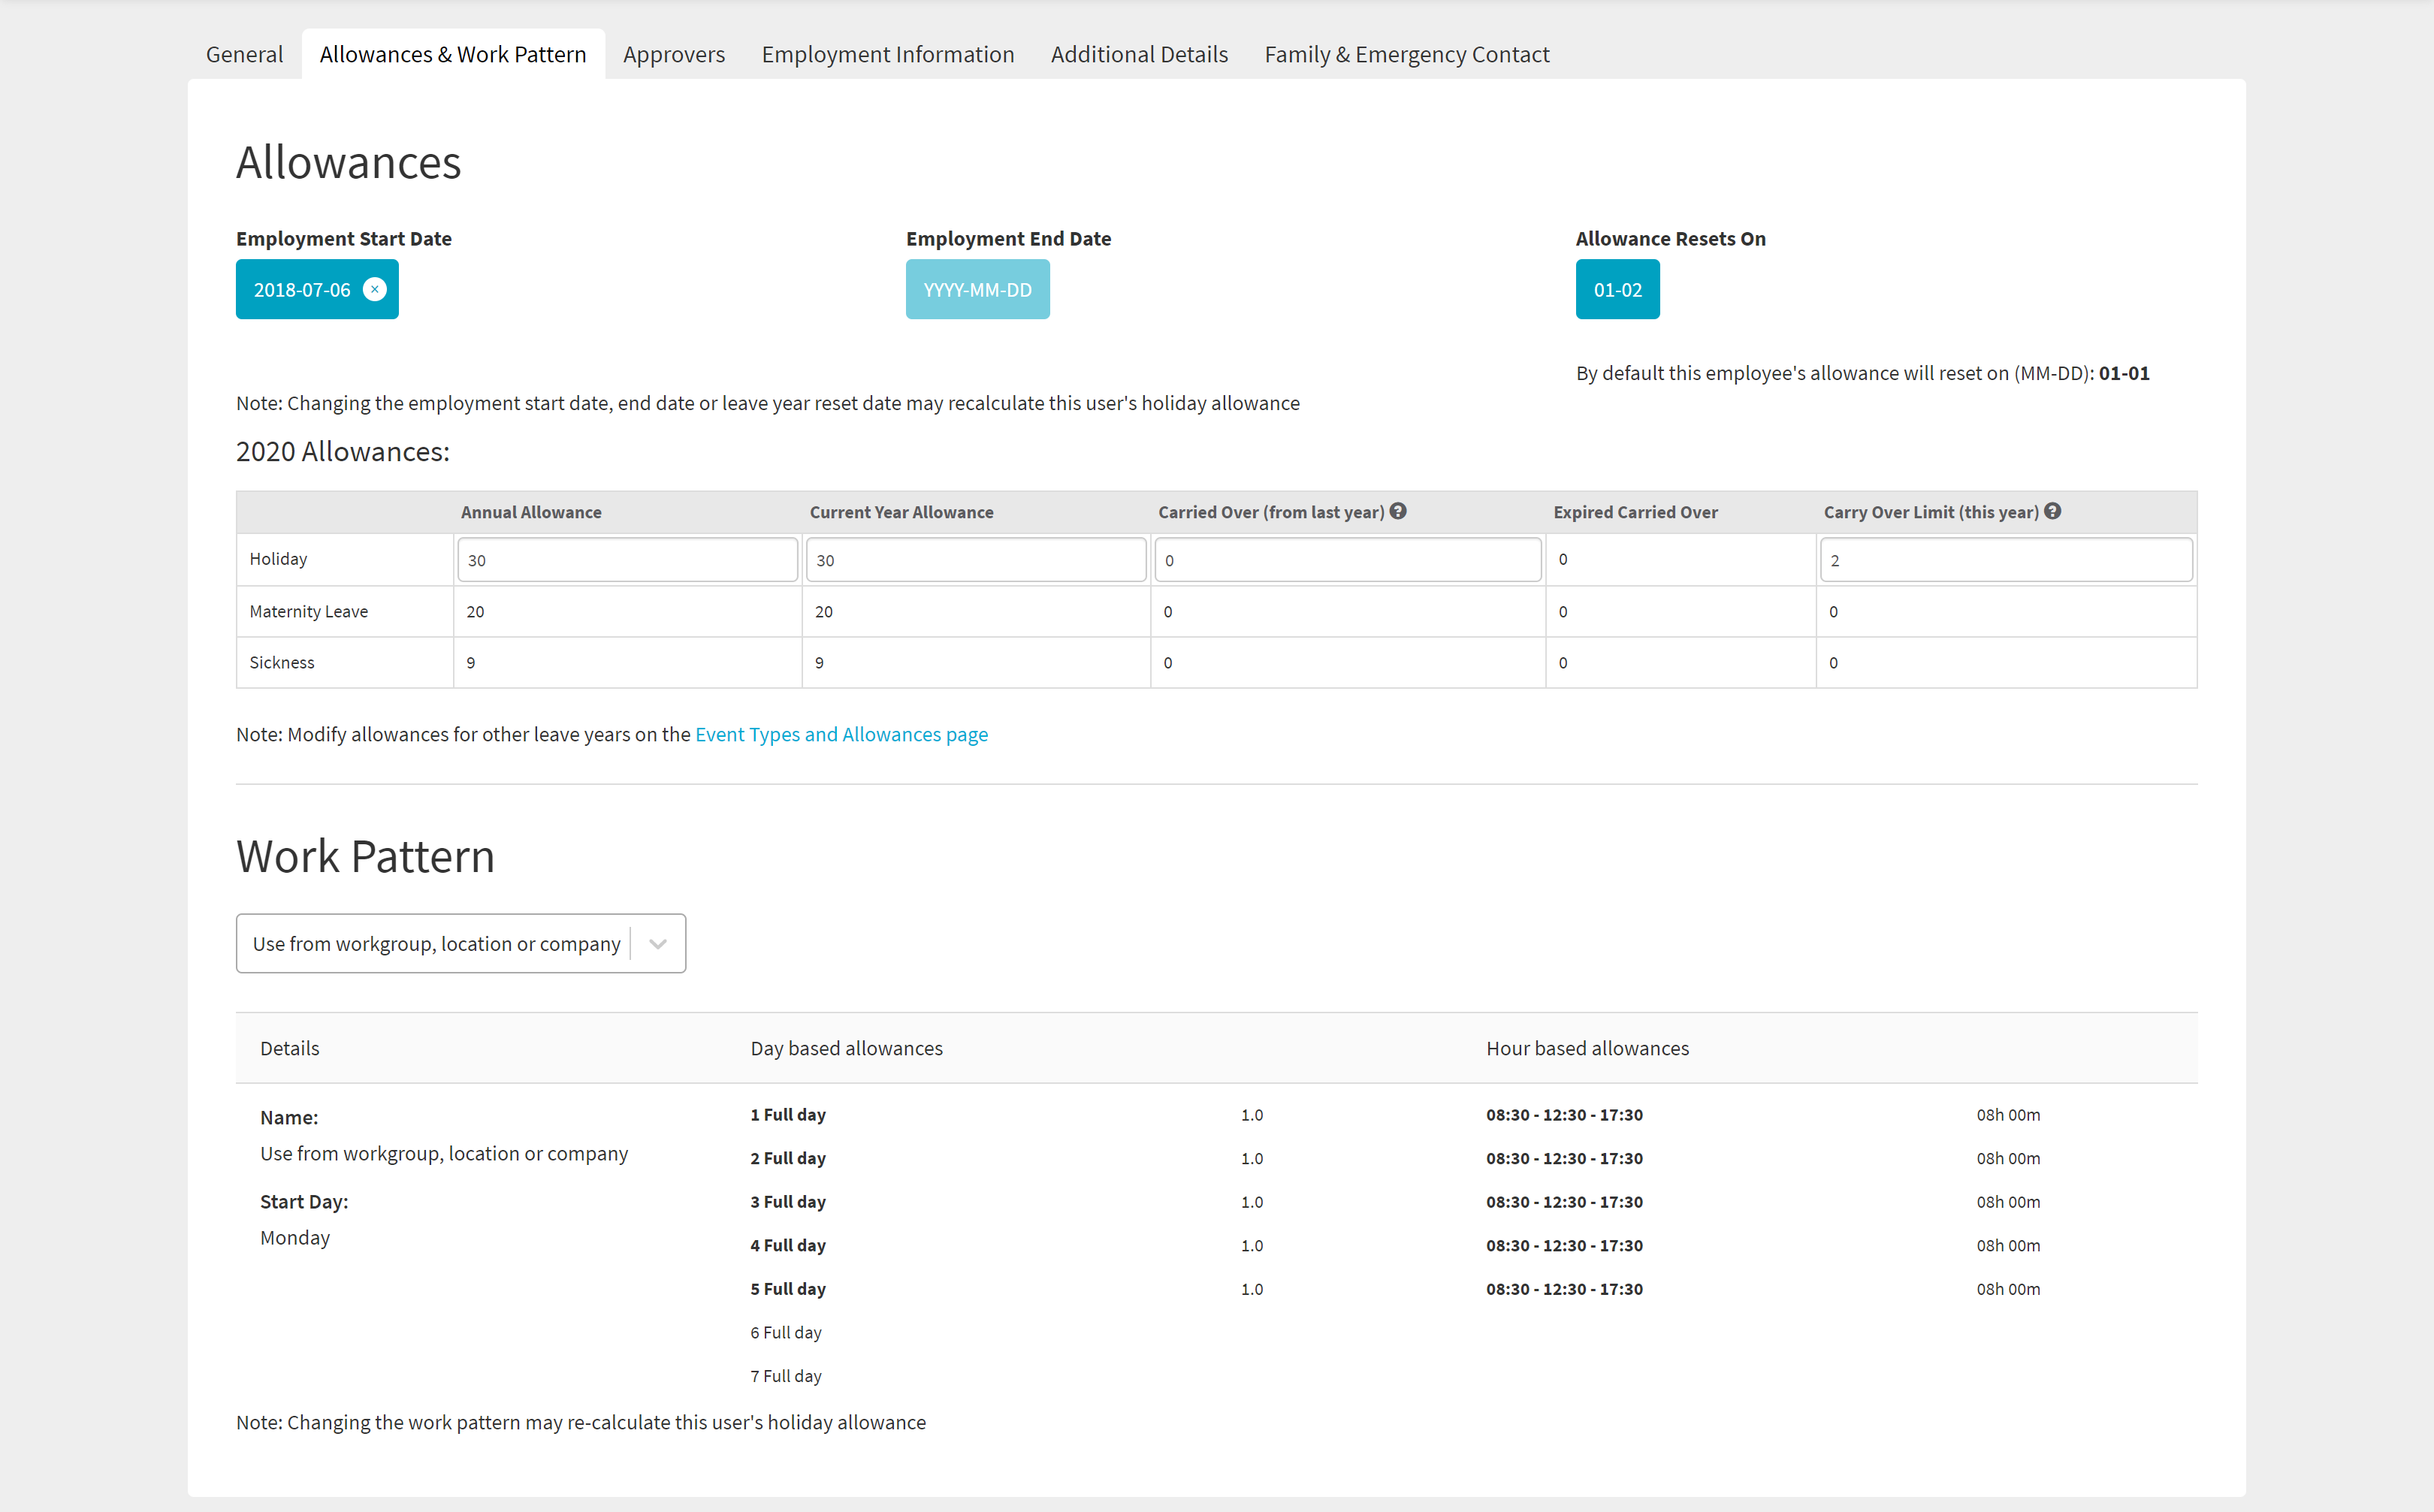
The Allowances & Work Pattern tab has two sections: Allowances and Work Pattern.
Allowances
The allowances section provides information about the user’s employment dates and their leave and absence allowances.
Employment Start Date
This field specifies the user’s employment start date. If the start date falls within their current leave year, then the date is used to pro rata their allowance for the current year. If you don’t enter a start date, then the system assumes that the user started before the current leave year and is therefore eligible for a full year’s allowance.
Employment End Date
This field specifies the user’s employment end date. When you enter an employment end date, it is used to pro rata their allowance for the final leave year. The system will ignore and not use any requests that fall after the date for allowance calculations. The user will, however, remain active on the system after the date, so you should deactivate them with the ‘Active?’ setting in the ‘Personal Details’ section of the ‘General’ tab when required.
Allowance Resets On
This field specifies the user’s leave year start date. The system uses the day and month to define the start date for this user’s leave year. Unless you enter a date, the system will use the company leave year, which is shown below the entry box. In this example, 1st January, ‘By default, this employee’s allowance will reset on (MM-DD): 01-01’.
YYYY Allowances
This section displays the current leave year allowances for all event types with an associated allowance that this user can request. Changing their employment start date, end date or allowance leave year reset date settings above will re-calculate this employee’s allowances and may change the information displayed.
You can edit all fields except ‘Expired Carried Over’. This is especially useful when you want to change a user’s work pattern but want their yearly allowance to remain unchanged. Normally, if you change their work pattern, then the system will recalculate their ‘Annual Allowance’ by comparing their new work pattern with the company default. If you want to keep the original ‘Annual Allowance’ or set another value, then just edit it and the system will recalculate their ‘Current Year Allowance’ based on that ‘Annual Allowance’.
If you want to change allowances for other leave years, you can click the Event Types and Allowances page link at the bottom of the section, which will take you to that page to allow you to do that.
Work Pattern
The Work Pattern section provides information about the work pattern assigned to the user.
The work pattern setting displays the current work pattern assignment and allows you to select an alternative, previously defined pattern, from a drop-down box. It also displays a summary of the selected work pattern below. You can create and manage work patterns on the work patterns page. Please note that changing the user work pattern will trigger the system to re-calculate the employee’s holiday allowance.
Approvers tab
The Approvers tab has a 1st Level Approvers section and additionally an Approvals section if the user is an approver.

1st Level Approvers
The 1st Level Approvals section provides information about who is the first level approver for the user. You can add and remove a single 1st level approver here for any leave type that the user can request. The drop-down boxes allow you to select both the leave type and the approver. Although you can have two 1st level approvers and a 2nd level approver, you will need to use the Approvers page to manage those options.
Approvals
It will only display this section if the user is an approver and provides a link to the Approvers page to allow you to specify which users this user will approve.
Employment Information tab
The Employment Information tab has a single section with twelve fields which you can use to hold extra employment information about the user.

Employment Information
Position
Designation
Function
Primary Cost Centre
Manager – drop-down to select user
Secondary Cost Centre
Salary
Currency – drop-down list
Confirmation Date
Probation Start Date
Probation End Date
Termination Reason
Additional Details tab
The Additional Details tab has a single section with thirteen fields which you can use to hold extra personal information about the user.

Additional Details
Nationality
Gender
Identification / Passport Number
Place Of Birth
Date Of Birth
Local Address
Personal Email
Home Telephone
Mobile Telephone
Ext
Qualification
Reference
Additional Information
Family & Emergency Contact tab
The Family & Emergency Contact tab has two sections: Emergency Contact and Family.

Emergency Contact
The Emergency Contact section allows an emergency contact to be assigned, edited and displayed. There are three fields.
Name
Relationship
Phone number
Rather than edit these fields directly, you can automatically fill the information from the family member list below with a single click, which is the recommend way to manage the Emergency Contact.
Family
If you have not added members, then you will see the ‘There are no family members yet.’ message until you add one using the ‘Add Family Member’ button. When you click the button, you will then see this pop-up window.

The window has eight fields, the first four of which are mandatory.
First Name
Last Name
Relationship
Phone number
Date Of Birth
Nationality
Gender
Identification / Passport Number
If you want to quit adding the new member, click the ‘Cancel’ button to return to the Family & Emergency Contact tab. Alternatively, if you are happy that the information is correct, then click ‘Submit’ to add the new member.

On the right-hand side of each listing, there are three action icons.
Head Icon
Clicking the ‘Head’ icon allows you to assign that member as the Emergency contact.
Pencil Icon
Clicking the ‘Pencil’ icon brings up the ‘Add family member’ pop-up window filled with the selected members’ information to allow it to be edited.
Dustbin Icon
Clicking the ‘Dustbin’ icon will delete the member.
You could use the ‘Head’ icon to assign the previously added member as the Emergency contact and add another family member as shown below.
