
Work Patterns
LeaveWizard supports flexible work patterns (shift patterns) suitable for full-time and part-time users and administrators. As an administrator, you can create multiple virtual representations of actual work patterns. Then you can assign them to locations, work groups or users, with precedence in that order, i.e. An assigned user work pattern overrides a work group one, which overrides a location work pattern assignment. If an administrator does not assign a work pattern, then the system will use the default company work pattern for users.
Users can see which work pattern an administrator has assigned them to by, depending on their role, looking at the ‘My Allowance’ or ‘Allowances’ section of their Dashboard or the ‘Allowance’ tab of their My Leave page.
Managing Work Patterns
As an administrator, you can manage work patterns by selecting ‘Work Patterns’ from ‘Configuration’ on the main menu. From this page you can create new, edit existing and delete work patterns and set the default work pattern.

The page lists all the work patterns that your company has defined and that are available. Initially, when an administrator created your company account, our system created a work pattern named ‘7 days (5 work, 2 off)’ automatically. As the sole work pattern, it became the default. Although you can change this work pattern, we recommend you don’t do that and create new work patterns as needed.
For each work pattern, there is a list of the days in the pattern, and the hours worked on each day. The page displays working days in bold and non-working days in normal text.
Details
This section displays the work pattern name and the work pattern start day.
Day Based Allowances
This section lists the days in sequence. It shows whether the day is a half or full day, and the total number of days worked. In this example, users work 5 days in a sequence of 7 days, starting on a Monday.
Hour Based Allowances
This section lists the hours worked each day in sequence. In this example, users work 8 hours for each of the 5 working days, giving 40 hours in the 7-day sequence. The hours worked are applicable only to hour-based leave allowance calculations.
New Work Pattern
You can create a new work pattern by clicking the ‘New Work Pattern’ button on the sub-menu.
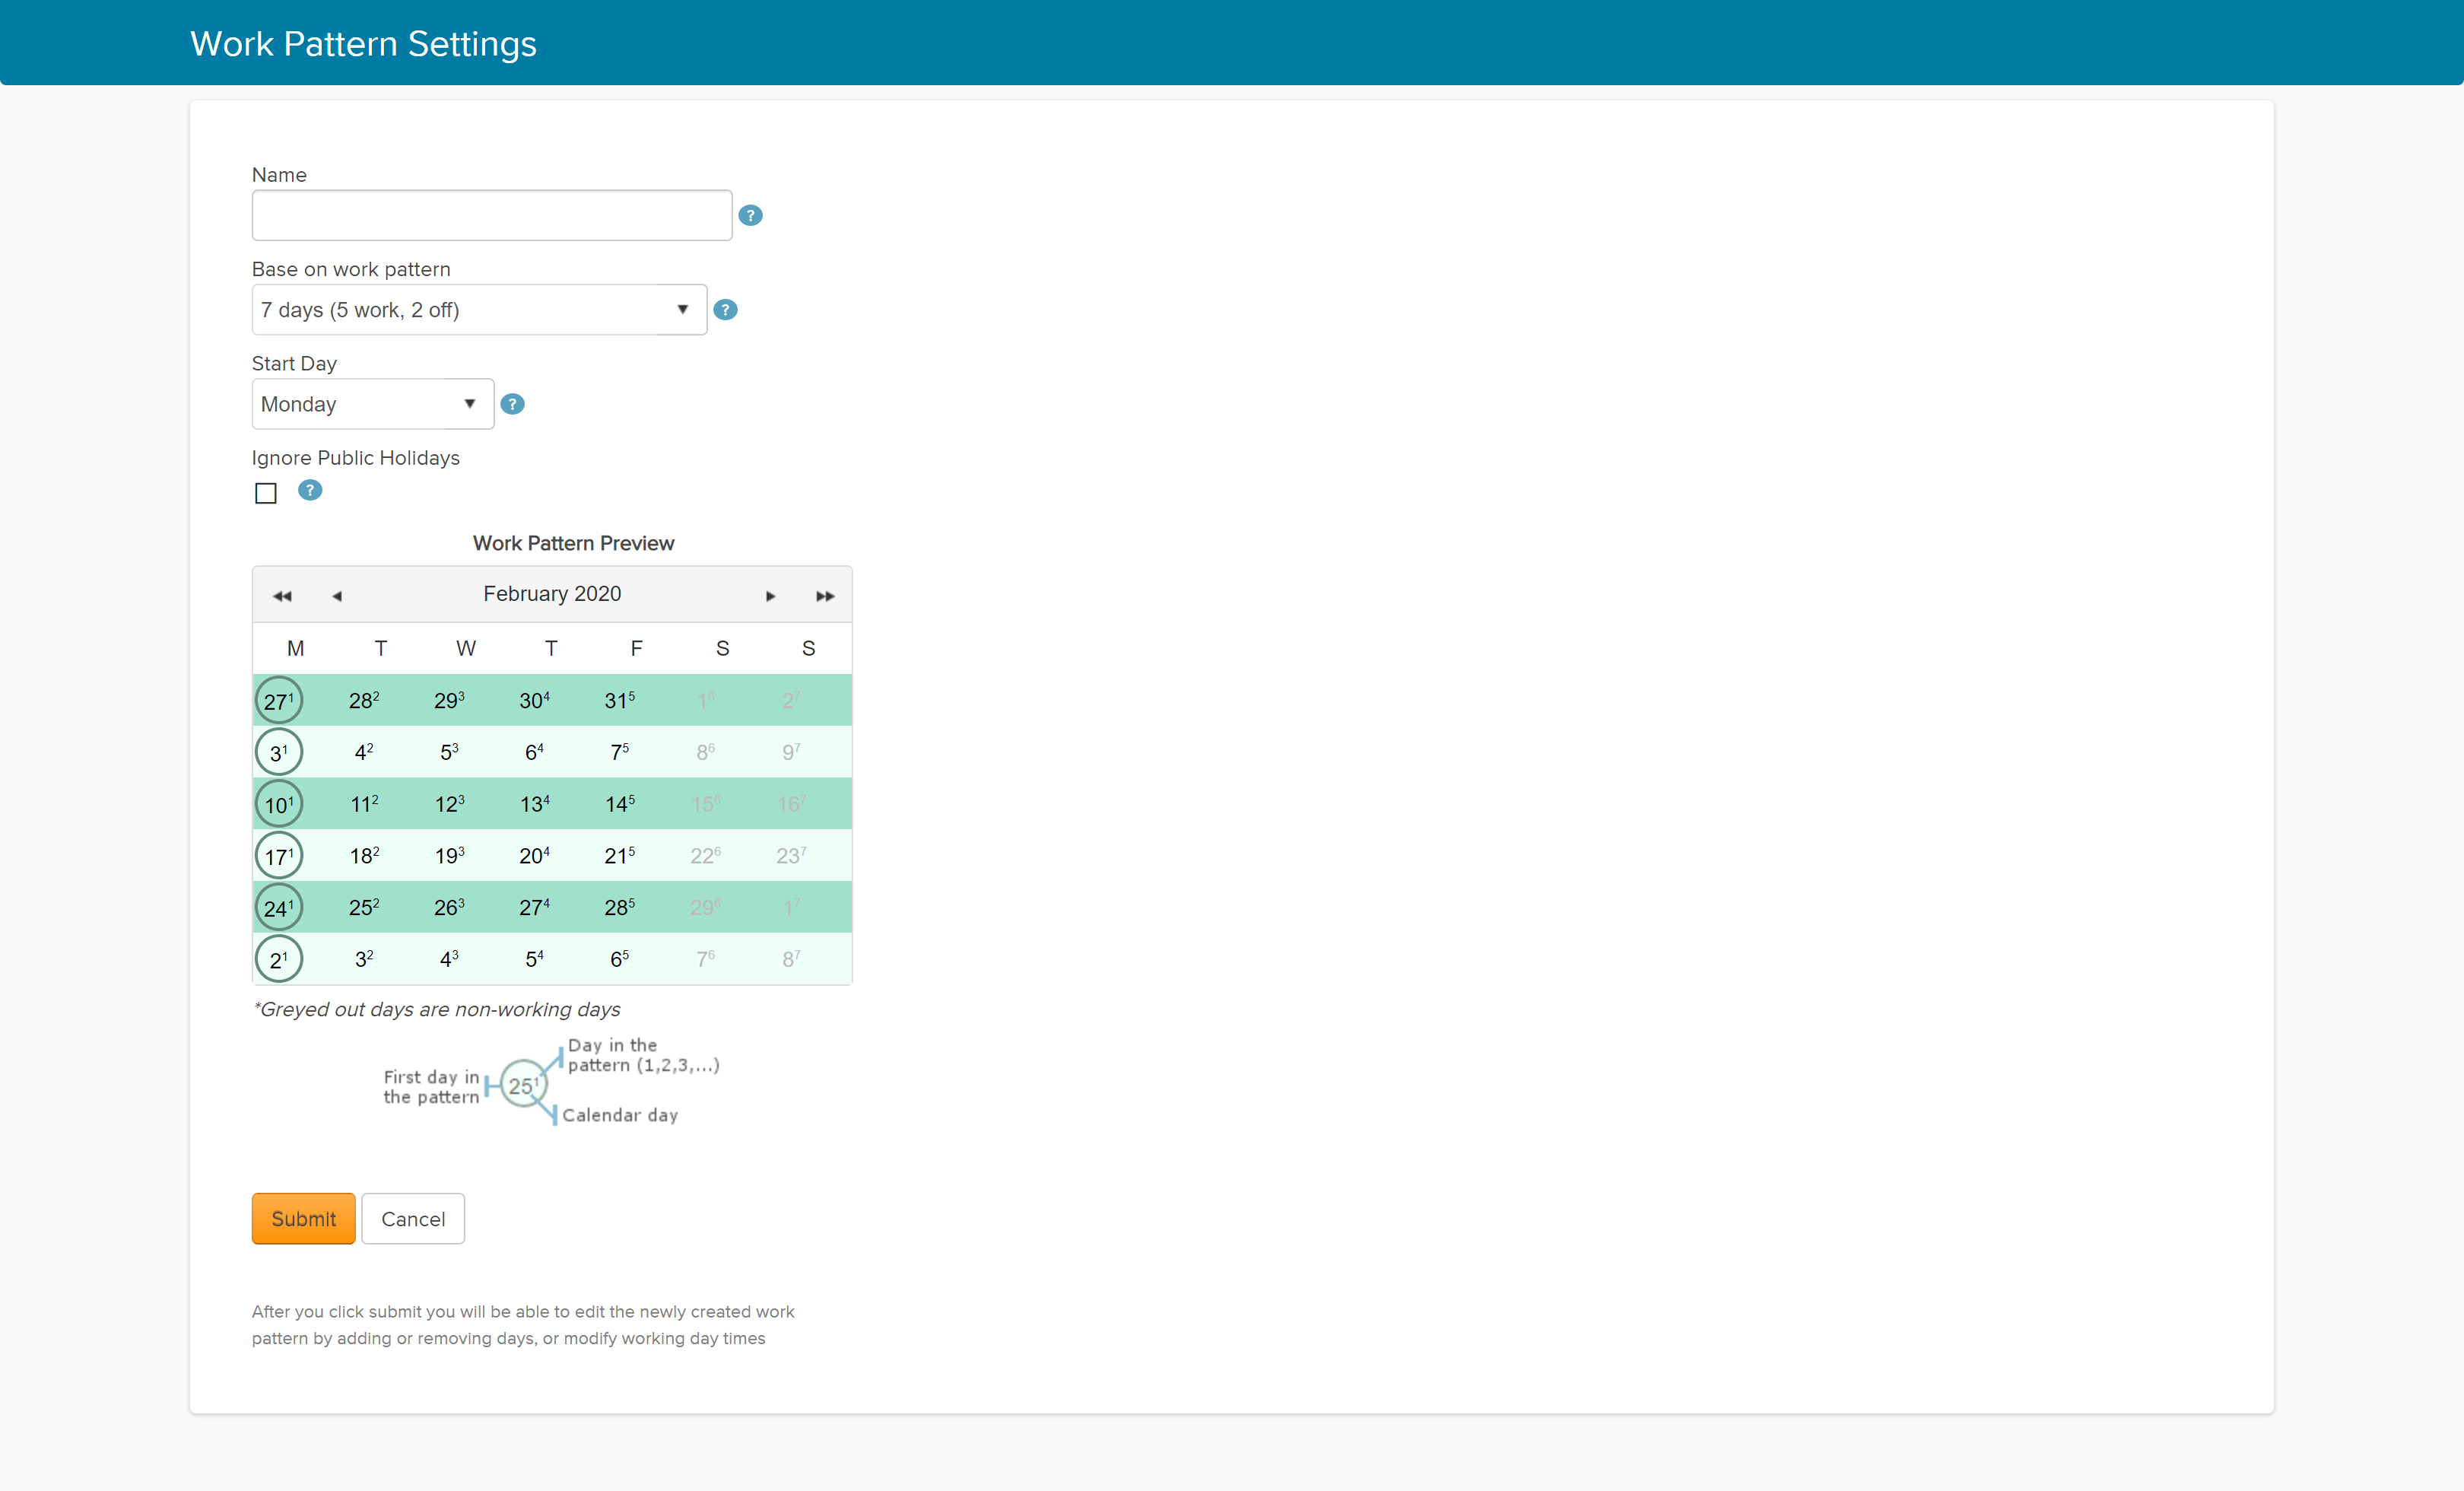
Name
This field allows you to enter a descriptive name for the work pattern. We recommend you use a name that describes the work pattern rather than the users that use it, i.e. ‘2-day week Tue & Wed’.
Base On Work Pattern
This setting allows you to select a template work pattern from the drop-down box that most closely represents the work pattern you intend to create. You then edit the base work pattern you selected to create a work pattern to match your exact requirements. So, this base template is just a starting point, which helps speed up the process.
Start Day
This setting allows you to select a day of the week, Monday – Sunday, from the drop-down box that the work pattern starts on. Normally this would be Monday, but sometimes it is more convenient to select another day.
Ignore Public Holidays
This setting allows you to specify whether LeaveWizard should ignore public holidays when calculating event duration for users on this work pattern, e.g. any existing public holidays will not reduce event duration.
Work Pattern Preview
The work pattern preview gives a visual guide of how the work pattern will look. It is a fully functional calendar, and you can navigate to whatever month and year you choose.

To identify the first day of each repeated pattern, it places a circle around the day. It displays the calendar day number in bold for workdays and in grey for non-working days. A superscript numeral shows the order in the pattern sequence for each day. In the example, the pattern is for 7 days, starting on a Monday. So, it circles each Monday that has a superscript ‘1’, and Tuesdays have superscript ‘2’, etc. Monday to Friday are working days and shown in bold.
Edit Work Pattern
You can edit a work pattern by clicking the ‘Edit’ button on the right-hand side of the listing for that entry. If you created a new work pattern using the technique described above, named ‘Half Day Mon, Tue & Wed’, based on the ‘7 days (3 work, 4 off)’ template…
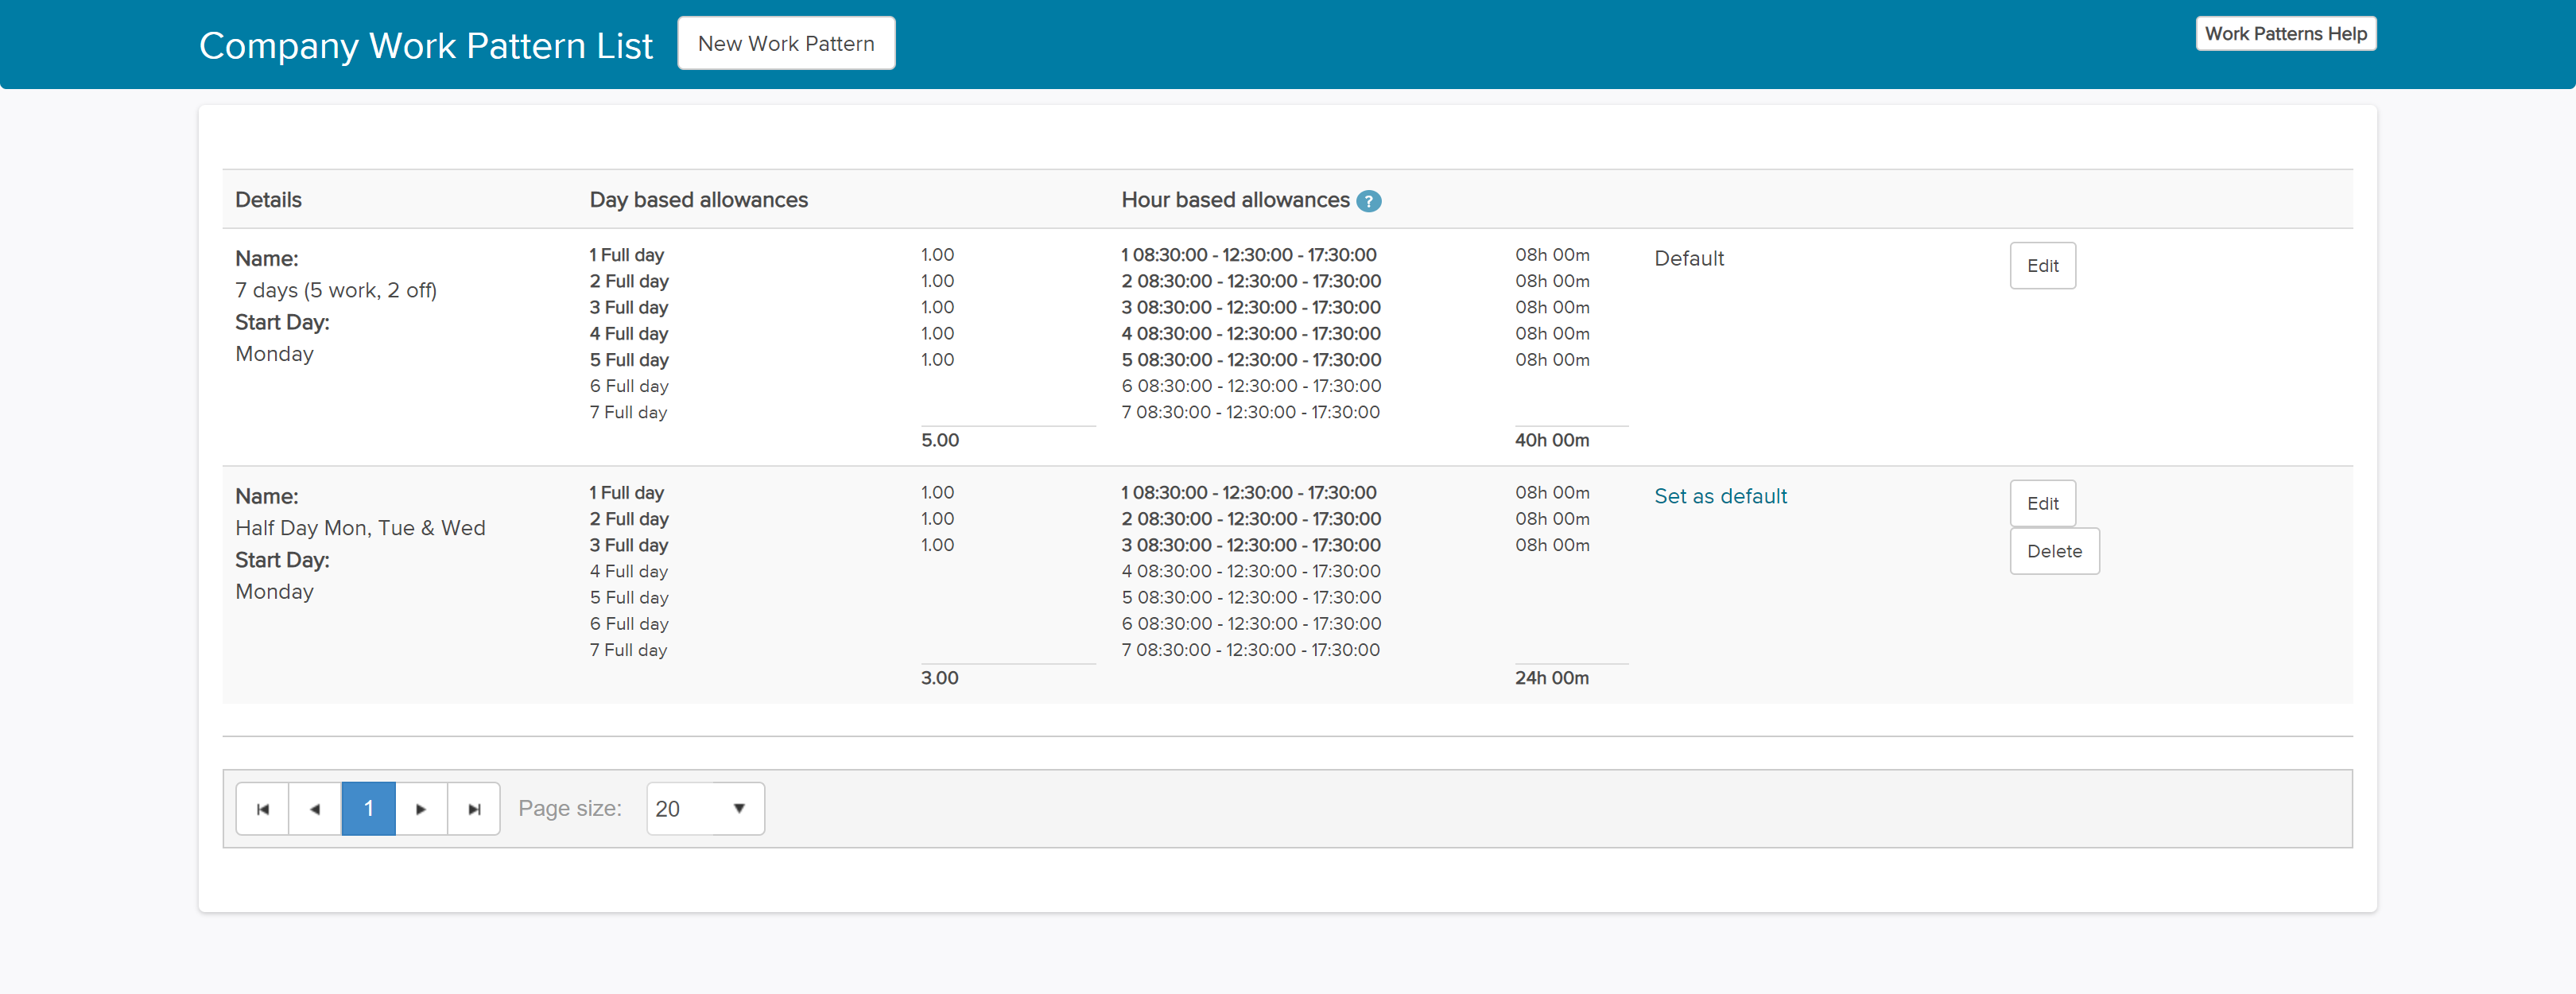
…you can then edit it.

When you created the work pattern, you entered the ‘Name’, ‘Start Day’ and ‘Ignore Public Holidays’. You can edit these fields here. It also displays ‘The Work Pattern Preview’, which will change to reflect the edits you make. An additional section, ‘Work Pattern Days’, becomes available to edit the work times for each day of the work pattern.
Work Pattern Days – Display Mode
This section displays a list of all the days in the pattern and information about the hours worked on each day.
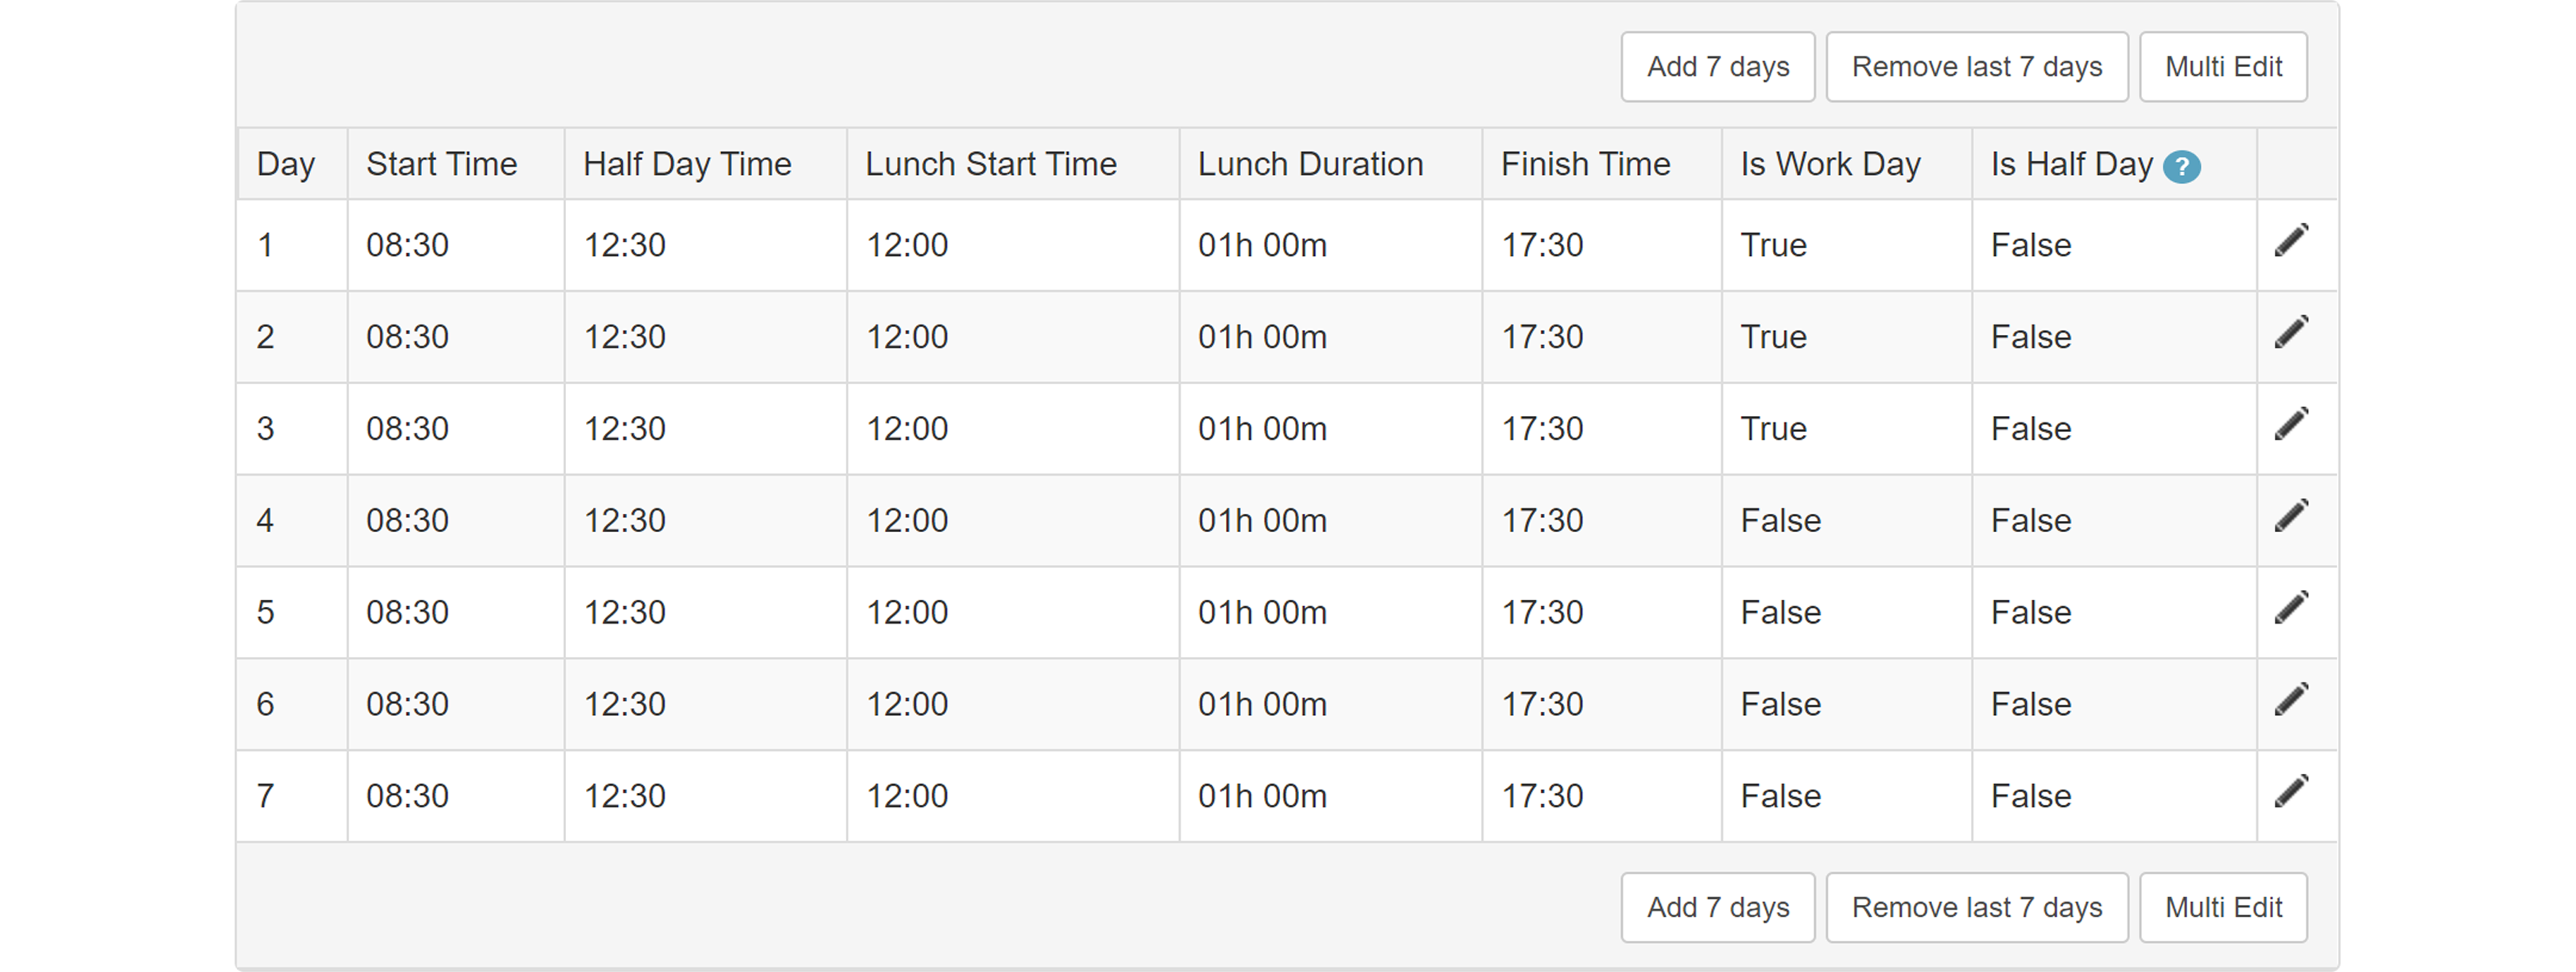
Day
This displays a number representing the sequential order of the day.
Start Time
This is the workday start time.
Half Day Time
This is the time at which an AM half day ends and a PM half day starts applicable to day-based leave types.
Lunch Start Time
This is the lunch break start time.
Lunch Duration
This defines the lunch break duration and, along with the Lunch Start Time, the lunch end time. You can set it to zero if there is no lunch break.
Finish Time
This is the workday finish time.
Is Work Day
This defines whether the system should count the day as a working day (true) or not (false).
Is Half Day
This defines whether the system should count the day as a half day (true) or not (false). It will only use this setting for day-based allowance leave types. It will have no impact on calculating duration for leave types using hour-based allowance, for which it will use the specified start, finish and lunch times.
At the top and bottom of the Work Pattern Days are 3 action buttons.
Add 7 Days
Clicking this button will extend the work pattern sequence length by 7 days.
Remove Last 7 Days
Clicking this button will reduce the work pattern sequence length by 7 days.
Multi Edit
You can edit a single day by clicking the ‘pencil’ icon on the far right-hand side of each day, or you can click ‘Multi edit’ to edit all days simultaneously.
Work Pattern Days – Edit Mode
We can edit the information provided by the ‘7 days (3 work, 4 off)’ template used to create the required ‘Half Day Mon, Tue & Wed’ work pattern. Assuming we want Monday to be a half-day working until 13:00, we can make the changes by clicking the ‘pencil icon’ on Day 1.

The appearance of Work Pattern Days will change, with all fields of Day 1 becoming editable except for the Day sequence number. Also, the edit icon becomes a ‘tick’ and a ‘cross’ icon to either accept or reject the edits, and the three buttons at the top and bottom of the section change to become two new buttons, ‘Update’ and ‘Cancel’.

To create a work pattern where Day 1, Monday, starts at 8:30 and ends at 13:00, set ‘Lunch Duration’ to ’00h 00m’ and ‘Half Day Time’, ‘Lunch Start Time’ and ‘Finish Time’ to ’13:00′. To set as a half-day, check the ‘Is Half Day’ tick box. Then click the ‘tick’ icon or ‘Update’ to finish the edit.

If the finish time on Tuesday and Wednesday is 17:00 rather than 17:30, then you can edit these by using the ‘pencil’ icon on each line separately or using the ‘Multi Edit’ button as shown.
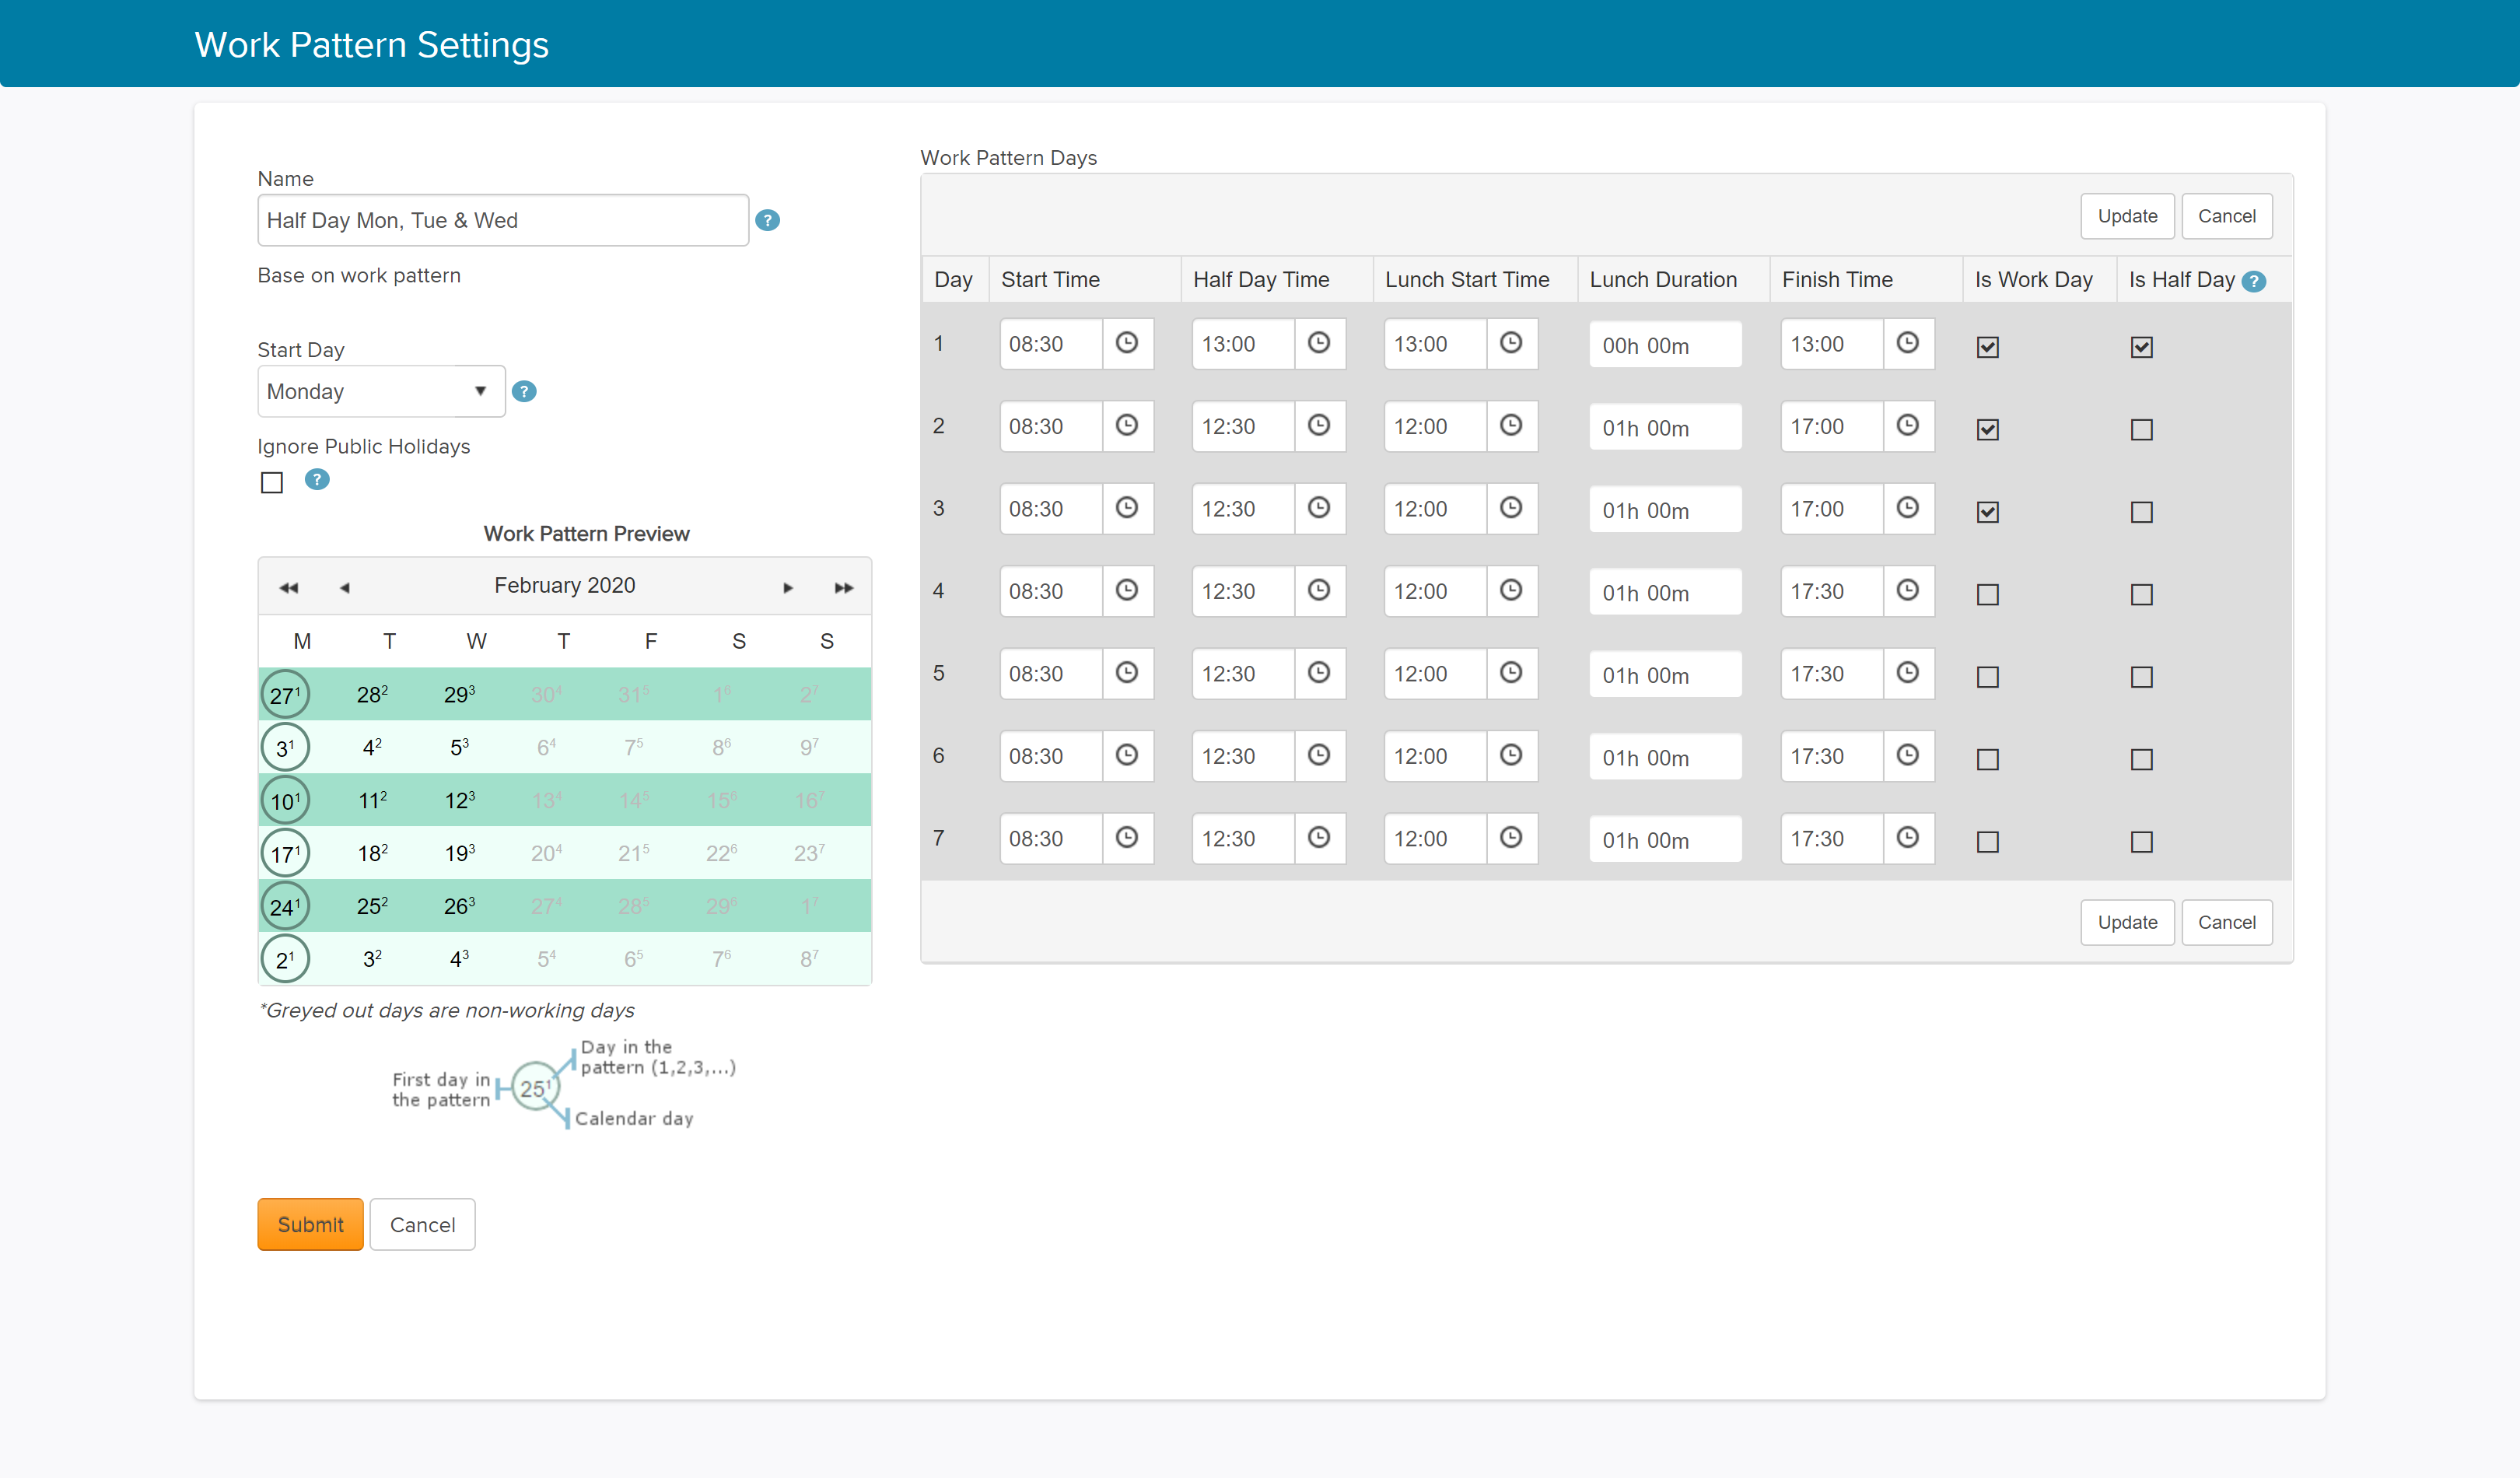
Once your editing is complete, click Submit to finish. You now have a completed new 2.5 day, 19 hour 30 minute work pattern.

Accommodating Complex Work Patterns
Work patterns on LeaveWizard are based on weeklong (7 days) periods. If you need to create a cyclical work pattern which is not based on periods of one week, such as a ‘4 days on, 4 days off’ repeating work pattern then you need to define a long work pattern that ‘fits’ into an exact number of weeks, i.e. a multiple of the cycle that is divisible by 7 (7-day week). The example of ‘4 days on, 4 days off’ is an 8 days cycle. You would need to create a 56 day long work pattern to define this, where 56 is exactly divisible by 8 and 7. If you need help with these complex work pattern please contact our customer support team, who will be glad to advise.
The default Work Pattern
In the list of work patterns, it has marked one as ‘default’. The others have links to ‘Set as default’. In this way, there is only one default work pattern, and you can click a link to change the default. You can use any work pattern as the default, but it is not possible to delete the current default work pattern.
Changing work patterns can affect user allowances. When you assign a work pattern to a user, the system compares the hours or days worked to the default work pattern to calculate their annual allowance. So, ignoring other factors, if the default work pattern is 4 working days and the user work pattern is 2 working days. Then, for a day-based holiday leave type with an annual allowance of 20 days, their calculated allowance would be 10 days.
Please note that at present, LeaveWizard will use the current work pattern assigned to the user to calculate the allowance for the entire year. Therefore, if a user changes work pattern mid leave-year the recommended course of action is to end their employment and start them as a new user, transferring their remaining allowance. This will correctly calculate and apportion the allowances. Please contact our customer support team if you need further advice.
Assigning Work Patterns
The default work pattern is the company work pattern unless you override it.
You can also define a work pattern for all users in a location or all users in a work group on the Organisation And Employees page by editing the location or work group.
You can assign a work pattern and view the change history on their Employee Details page, which you can access from the ‘Organisation And Employees’ page by clicking on the user’s name link on the left-hand side of the member list.