
Okta SCIM User Provisioning
If your company uses Okta as an IdP (Identity Provider) to manage employees’ access to services, you can take advantage of Okta SCIM user provisioning to manage users in LeaveWizard. This feature is available to customers on LeaveWizard’s Premium plan.
When you enable SCIM provisioning, you will accomplish user management tasks, such as adding users and updating their details, with Okta. LeaveWizard will deactivate these functions on the web app.
We use the industry standard protocol SCIM (System for Cross-domain Identity Management) to provide the integration between Okta and LeaveWizard. To learn more about how Okta works with SCIM, please see their article, which will open in a new browser tab.
Configuring Provisioning
You need to enable SCIM provisioning on LeaveWizard and enable API (Application Programming Interface) integration and provisioning on Okta. However, before you do this, you need to set up Okta SSO (Single Sign On) if you have not done so already.
Enable Provisioning In LeaveWizard
As a LeaveWizard administrator, select company settings from the configuration option on the main menu. Navigate to the authentication section and click the ‘Reconfigure’ button.

If you only see a ‘Configure’ button, you need to configure SAML authentication first. Please follow the guidance in our Okta SSO (Single Sign On) article to do that.

Then tick the ‘Enable SCIM Provisioning’ box and click ‘Submit’.

Enable LeaveWizard API Integration On Okta
Sign into Okta as an administrator and select ‘Applications’ from the ‘Applications’ option on the main menu. Click the LeaveWizard link in the list of active applications.

Select the ‘Provisioning’ tab and ‘Integration’ in the settings column. Click the ‘Configure API Integration’ button.

Tick the ‘Enable API Integration’ option, which appears.

Then click the ‘Authenticate with LeaveWizard’ button, which appears.

A new browser window will appear with the LeaveWizard Login page. Enter your LeaveWizard username and password to authenticate. If authentication is successful, Okta will display a message that you have authenticated LeaveWizard’s API. Click the ‘Re-authenticate with LeaveWizard’ button to generate a new authentication token. Then click ‘Save’

Enable Provisioning On Okta
When you have authenticated our API, you can enable provisioning. Select the ‘Provisioning’ tab and ‘To App’ in the settings column. Click the ‘Edit’ link at the top, on the right-hand side.

- Tick the ‘Enable’ box next to ‘Create Users’. This will allow Okta to create users on LeaveWizard when you assign them to the LeaveWizard application in Okta.
- Tick the ‘Enable’ box next to ‘Update User Attributes’. This will allow you to update user profiles.
- Tick the ‘Enable’ box next to ‘Deactivate Users’. This will allow you to deactivate users on LeaveWizard when you deactivate them on Okta.
- Tick the ‘Enable’ box next to ‘Sync Password’. Also, select the ‘Sync Okta Password’ option. This will allow users to synchronise their password with LeaveWizard when they change it.
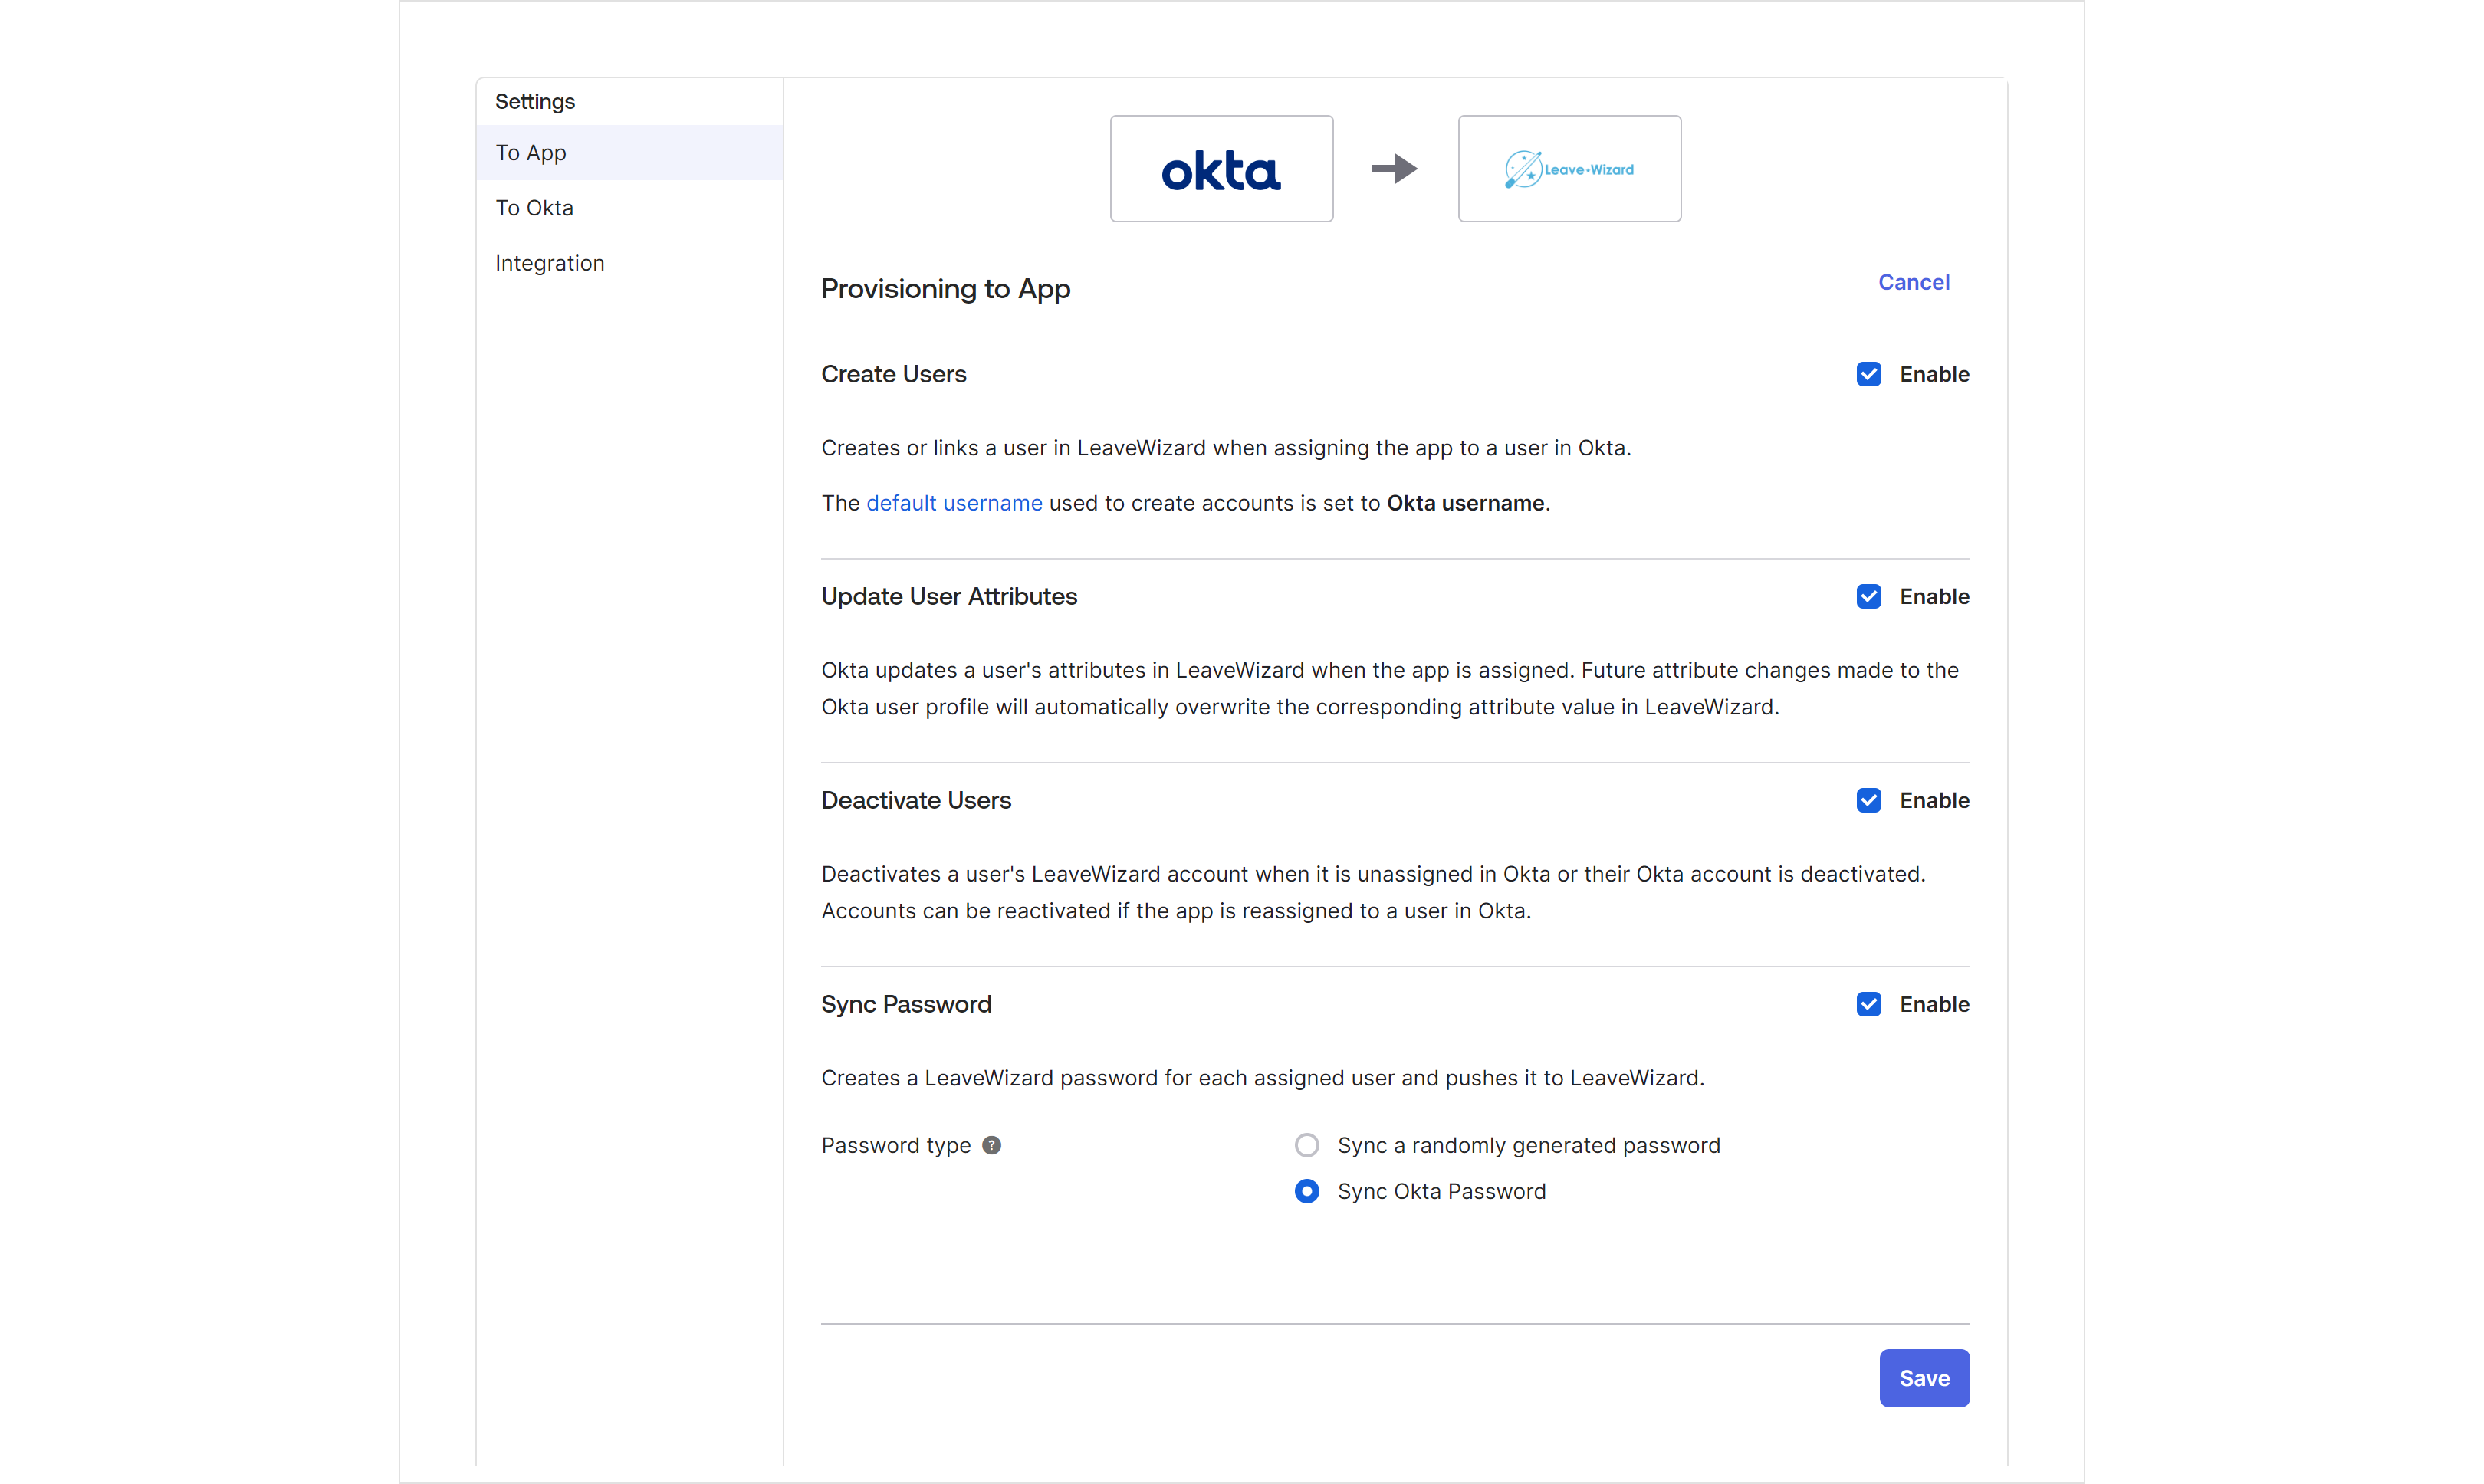
Check that the settings match those shown in the screenshot and click the ‘Save’ button to save your updates.
Using SCIM
When you have enabled SCIM provisioning on LeaveWizard and Okta, you need to add your users to Okta and assign them to the LeaveWizard app. You should add and assign any existing LeaveWizard users to Okta, which is best done using the Okta import function described below.

When you add and assign new LeaveWizard users from Okta, it will add them as pending users. You will need to complete the add user process on LeaveWizard for these users. See the Adding New Users With SCIM Enabled section in the Adding New Users knowledge base article.
Importing Users Into Okta
On the Employee details page of LeaveWizard, we provide many fields to store information about the user. If you enable SCIM provisioning and assign an existing LeaveWizard user to the LeaveWizard app in Okta, it will overwrite their employee details with the information on Okta. So, if you want to keep this information, you will need to copy the data from the Employee details fields and enter it into the Okta attribute fields when you add them. For example, if you have set ‘Currency’ on the ‘Employment Information’ tab and ‘Nationality’ on the ‘Additional Details’ tab, and you have not set these attributes on Okta, it will clear them. You can manually copy the values from their respective fields on LeaveWizard and enter them as attributes on the fields of the same name when you add the user from Okta. However, a better option is to use the Okta import function to add the user and their data from LeaveWizard to Okta.
How To Import Users
To access the Okta import function, select ‘Applications’ from the ‘Applications’ option on the main menu. Click the LeaveWizard link in the list of active applications. Select the ‘Import’ tab.

If you click the ‘Import Now’ button, Okta will fill the user list with users you can import into Okta. It will mark users on LeaveWizard but not already in Okta as ‘NO Okta user matches found’ and provide you with the option to add them as a ‘NEW Okta user’. When you import them, by confirming the assignment, it will add them to Okta with their LeaveWizard employee details added as Okta attributes.

You can see their imported Okta attributes by selecting the imported user from the ‘People’ option of the Okta ‘Directory’ menu. On the ‘Applications’ tab, select the edit icon on the right-hand side of the LeaveWizard app row of their ‘Assigned Applications’ list. Here you can see you have successfully imported them from their LeaveWizard employee details.


If the user already exists in Okta when you import them, Okta will mark them as an ‘EXACT Okta user match’ and update Okta’s attributes from LeaveWizard. If the Okta attribute already has a value set, then Okta will update the new value from LeaveWizard.
Supported Provisioning Features
LeaveWizard supports the following provisioning features.
Push Users
Okta adds users assigned to the LeaveWizard application as members of your LeaveWizard company.
Import Users
You can import users created in LeaveWizard into Okta. Either Okta matches them with an existing Okta user or it creates a new user.
Import Groups
You can import ‘workgroups’ from LeaveWizard as ‘Groups’ in Okta.
Push Groups
You can push Okta ‘Groups’ and their members to LeaveWizard ‘workgroups’ and members.
Update User Attributes
Users in Okta that are assigned to the LeaveWizard application can have their profile information updated from Okta.
Deactivate And Reactivate Users
You can deactivate or reactivate users in Okta that are assigned to the LeaveWizard application.
Sync Password
Users in Okta that are assigned to the LeaveWizard application will have their passwords in sync with LeaveWizard.
Single Sign On
SP-Initiated flow allows the SP (Service Provider), LeaveWizard, to start the SSO (Single Sign On) process. This option gives users the ability to sign into LeaveWizard with their SSO email address. LeaveWizard sends an authorisation request to the IdP, Okta, and when they authenticate the user’s identity, LeaveWizard logs them in.
Limitations
Here is a list of limitations and characteristics of Okta provisioning with LeaveWizard.
A User Can Become Active On LeaveWizard But Remains Unassigned On Okta
If you try to assign a user with Okta and enter invalid data for a custom field, you will get a warning message that the data is invalid. Okta will not consider the user assigned but will activate the user on LeaveWizard, leading to an active status mismatch. The user needs to be reassigned with valid data to rectify this.
Groups
LeaveWizard only allows a user to belong to a single workgroup at a time. If you push a group from Okta to LeaveWizard when you had already assigned a user to a different workgroup, it will automatically move them from their old workgroup to the newly pushed workgroup.
Importing
If you set a LeaveWizard field from an attribute in Okta, subsequent changes to that field in LeaveWizard (which requires you to disable SCIM) will not update the corresponding Okta attribute if you import them. You will need to clear the attribute value in Okta, which will clear the value in LeaveWizard, to allow imports from LeaveWizard to update the corresponding Okta attribute again.